I come across many people who when asked “do you use a bronzer?” They usually own one, but often aren’t quite sure what to do with it. Same with highlighter! There’s so many easy ways to sculpt your face with highlighter and bronzer - you just have to know where to place ‘em.
Getty images
So what’s the point of using a highlighter and bronzer anyway? These two amazing pieces of makeup add subtle dimension to the face, making your features and bone structure sing! Yes, this is considered contouring, but as long as you go about it in a light-handed matter, you won’t look like Kim K circa 2002. (P.S. obsessed with her makeup these days !!) Bronzer also will give a warm glow to the skin when applied all over, so it’s a great multipurpose product.
Bronzed Beauty!! @ianjacobphotography⠀@meaganlee_1 @brisoffa⠀@miamihair_chantel⠀
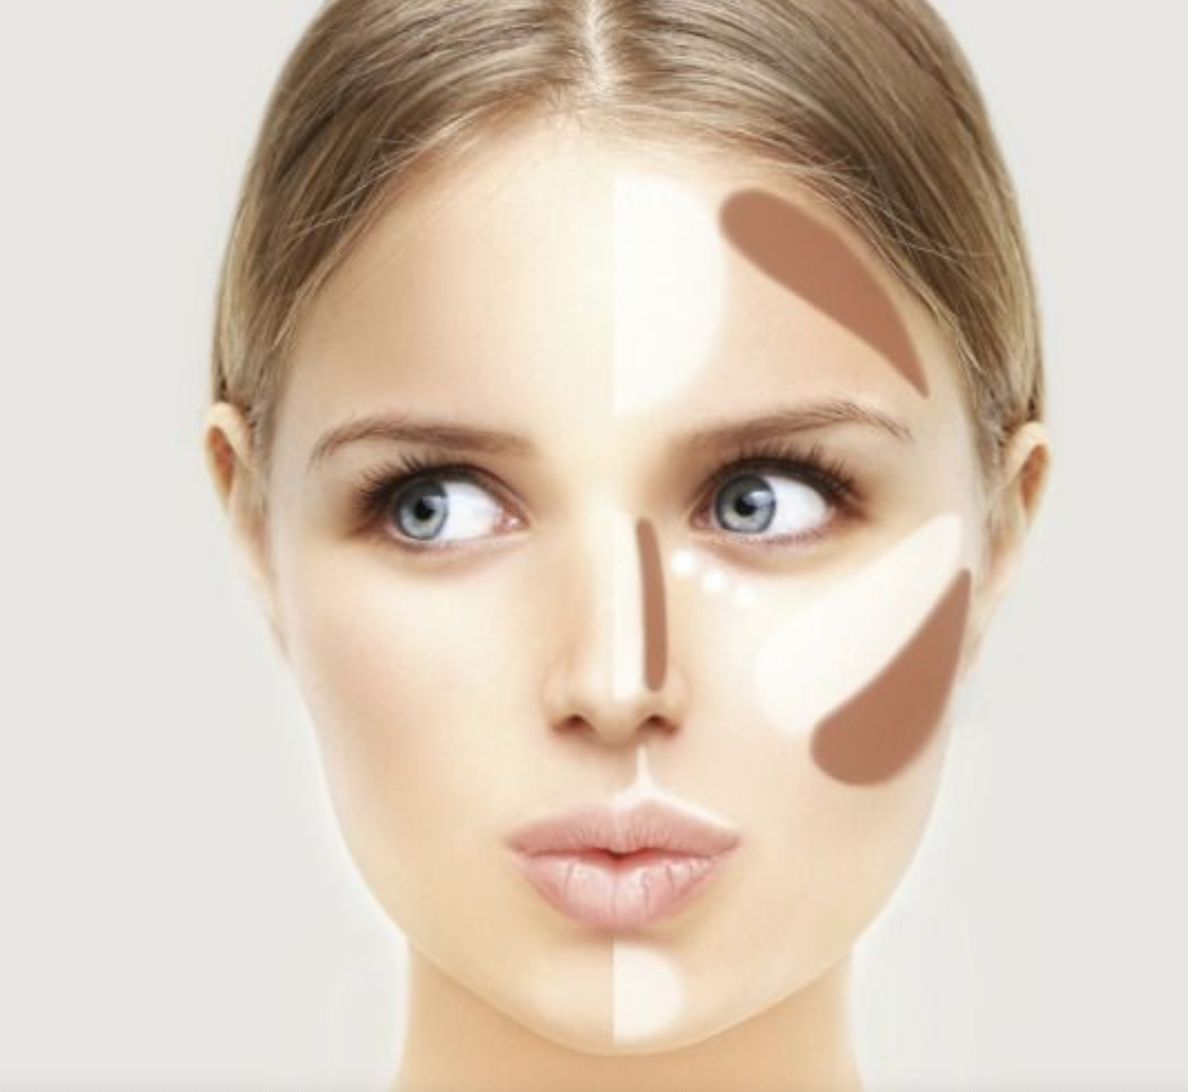
After applying foundation, the order of the two doens’t really matter, as long as the placement is correct. To contour, start with a matte bronzer, emphasis on the matte. This is important because a shimmer bronzer will give a “pop” effect, and for this purpose we want a matte formula which will help recede the areas where applied. I start by applying my bronzer at the hairline to minimize my forehead - this works so well if you have a long face shape or a larger forehead to make it appear smaller and your face a bit wider. Skip this step if you have a small forehead. Next, place your bronzer underneath the cheek bones in a curved shape, not a straight line. Start up by your ear, and blend down, but not all the way down towards your mouth! Stop in the center of your face, right under the apple of your cheek. This will give the appearance of more prominent cheek bones.
You can also bronze right under your jaw line to help create more definition there. Just be sure to blend some down the neck so you don’t have a line. If you want to thin your nose a bit, you can use a small all-over eye shadow brush to apply bronzer to each side of the nose. Below shows both proper highlight and contour placement.
Istock, Caithlin Pena
Now you can use a fluffy powder brush to lightly dust bronzer all over the face if you want to achieve a bronzy glow. This is where you can use a bit lighter shade, and one that has some shimmer if you’re into that. When in doubt, simply sweep across the center of the face- cheeks and upper nose, where the sun would hit most if you were to get a natural tan.
Now for the highlight. Power is the easiest to work with, especially for beginners. Using a small blush brush or an eye shadow blending brush (or fingers) start by highlighting the tops of your cheekbones. This is above where you would place your blush, which is in the center of the apple of the cheeks. You can place a small amount down the center of your nose. Go lightly here! You don’t want to emphasize your nose too much, you’re just creating high a low points on the face. Below: proper blush placement, and an example of good nose contouring:
I love accentuating the lips by highlighting the cupid’s bow and the top of the chin. Just take your ring finger and dab a small amount of product there. Finally, you can take some highlight above the brow (lightly) and on the inner corners of the eye. Below is a great example of the cupid’s bow, chin, and nose highlight. You can even do less product on the cupid’s bow and still get the effect.
Practice makes perfect with these techniques, so give yourself time, remember less is more, and for further education, youtube has endless hours of tutorials on this :)
xoxo,
Joelle of Dreamcatcher Beauty


